Ich habe vor drei Jahren gelernt diese Sterne zu falten und bin seitdem süchtig! Ihr könnt sie auch unter dem Namen Bascetta-Sterne im Internet finden. In Deutschland gibt es auch extra Bascetta-Sterne-Papier, aber ich finde es sehr steif zum Falten und außerdem scheint das Licht von Lichterketten da nicht so schön durch. Stattdessen empfehle ich schnöde Notizzettel - sind preiswert und in verschiedenen Farben zu haben. Man braucht 30 Blatt für einen Stern!
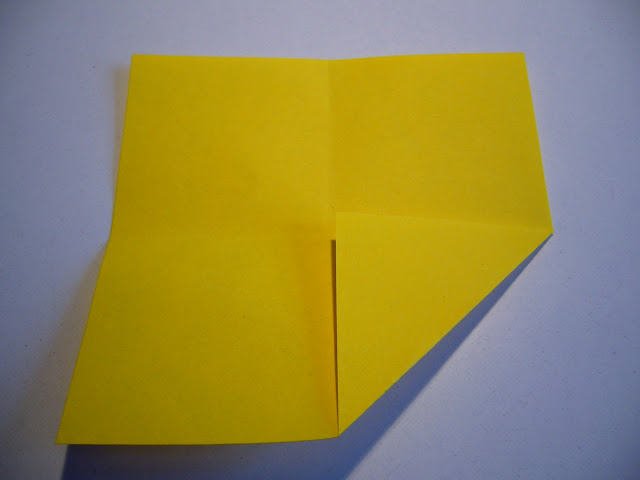
Schritt 1: Papier zweimal zur Mitte falten, so dass ein Kreuz entsteht. Untere rechte Ecke zur Mitte falten.
I've learnt this star three years ago and have been folding it ever since! It's just the perfect piece for decoration all year round - but especially for Xmas. It's called Bascetta star and you can find other DIY sites for that star all over the web. Even though there is special paper for these stars sold (at least in Germany), I tend to use normal notice paper blocs as it is way cheaper and still looks very nice when using the star with fairy lights. You need 30 pieces of paper for one star!
Step 1: Fold the paper to the middle twice to form a cross across the paper. Fold the right corner below to the middle.
Schritt 2: Zettel drehen und den Schritt wiederholen.
Step 2: Rotate the note and repeat Step 1.
* Sorry for the childish and not so stylish nail polish...
Schritt 3: Blatt umdrehen und die untere schräge Kante an die Mittellinie falten.
Step 3: Turn the note and fold the sloping corner to the middle line.
Schritt 4: Drehen und wiederholen.
Step 4: Rotate and repeat.
Schritt 5: Papier umdrehen.
Step 5: Turn the paper.
Schritt 6: Unter linke Kante wie oben gezeigt falten. (Dies ist die vielleicht kniffligste Stelle beim Falten. Aber keine Angst! Am Besten stellt ihr euch vor, dass da am Ende eine dreieckige Form bei rauskommen muss...Und achtet darauf, dass eine schöne Spitze entsteht.)
Step 6: Fold the left corner below like shown in the picture above. (That's the most tricky part of the folding procedure. At the end it is supposed to be in a triangular shape and take care to get a nice pointy end.)
Schritt 7: Einmal drehen und wiederholen.
Step 7: Rotate and repeat.
Nun sollte es so aussehen!
It should look like this!
Schritt 8: Schon wieder umdrehen...
Step 8: Turn it once again...
(Schritt 8)...und die kleinen Flügelchen zur Mitte falten.
(Step 8) ... and fold the little flaps to the middle.
Fast fertig!
Almost finished!
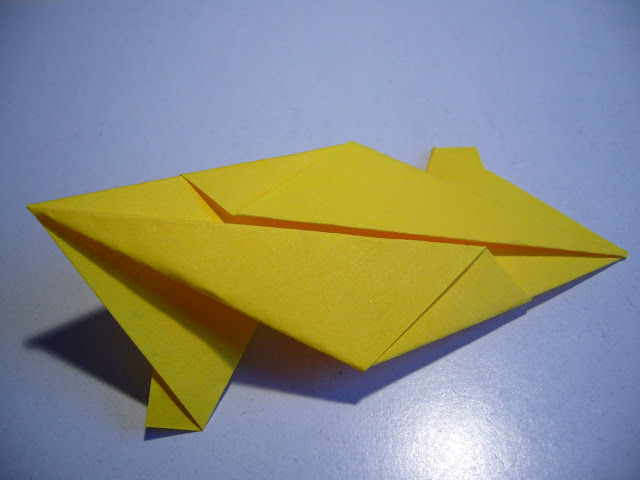
Schritt 9: Das Modul in der Mitte falten.
Step 9: Fold the part in the middle.
So wie hier!
Like this!
Ein Teil ist fertig - jetzt müssen noch 29 weitere her. Macht sich ganz gut abends beim Fernsehen, wenn man ein Buch oder etwas anderes als feste Unterlage hat. Irgendwann klappt das Falten schon fast automatisch. Allerdings sollte man immer mal wieder ein bisschen auf sauberes Falten achten, dann wird das Endprodukt - der Stern - richtig schön!
In Part 2 geht es weiter mit der Anleitung zum Zusammenstecken.
One part finished - only 29 more to go! One can do that while watching TV, but you need a book or something to fold on. Once you are used to the folding process you get quite fast doing this, but take care to fold precisely as the star will look its best with nice pointy ends.
In part 2 I'll show you how to assemble your star.


No comments:
Post a Comment