12/30/11
Christmas Bonus
Sorry to bother you again, but I just wanted to show you our Christmas tree 2011. We bought new glitter balls this year at Lauscha, where all glitter balls are originally from. The years before I decorated our tree with old glitter balls from our family. We've even got some from the 1950s. And we normally stick to traditional colors. We never intended to buy something in Lauscha - we just wanted to show some friends our Thuringian forest. But then - we saw a Christmas tree in white (frosted and with a luster like a pearl), green and tea brown (however you call it) glitter balls and fell in love!
I totally love the owl. (Can you spot it?) (And we spent most of pre-Christmas to fold Bascetta-stars to put them into the branches.)
The tree was from our garden.
(Pictures taken with the Lumix DMC FZ48. My mother got this camera for her birthday in late november. I'm very jealous. )
Yes, I just love this owl.
Now, hush, to bed I go. Good Night.
Christmas Markets No 9
Christmas time this year has been kind to me. I visited no less than 6 different Christmas Markets all over Germany. That's not bad. Not bad at all. (Normally I'm happy to see two different Christmas Markets in one Christmas season.)
This last picture was taken two days before Christmas Eve in Weimar. This Christmas Market has been voted the best Christmas Market of the World by the bloggers of CNNGo.com. See the article here.
Sadly it was a rainy and grey day. Which is odd as my visits in Weimar are normally sunny and much more welcoming. See picture for reference:
(Same spot in summer. It's a normal weekday market.) I love Weimar and just can't recommend a visit enough. It has atmosphere. History is all around (the good and the bad) and you can find many things in its crooked backstreets.
For me Christmas is already far, far away. I'm back in HD, collecting my stuff, sending some home, packing up the rest. It is just unbelievable how much I could fit in this small room of mine. And I totally need an e-book reader. All my books are way too heavy.
I hope I find time to write before leaving. I don't know how my internet connectivity will be for the next two months or so as my pension won't have wifi. Fortunately a friend lends me an internet stick, but the connection might be too slow for uploading anything here.
Only two days till leaving! Still can't believe it.
12/27/11
Christmas Markets No 8
I hope you had a wonderful Christmas with your loved ones. I - for my part - did. Sadly, our Internet broke down and I wasn't able to post some pictures I took earlier. These pics are from my last visit to the Heidelberg Christmas market. Once again - sorry for the poor quality.
12/20/11
Christmas Markets No 7
Christmas market booths in front of the Munich city hall.
Here I am. Sorting my things and throwing away stuff. Stuff I wouldn't throw away if I could help it. Stuff I'd love to give to friends if I'd knew they want it. But sadly, they don't. (Really, it's just old pens - most of them not working anymore -, some tea no one would drink, tons of copies from Japanese and English books (I swear I wanted to read those!!), seminar notes (I'm always thinking that I surely will need them again - but really it's about the definition of literature in different cultures and I'm fairly sure they are not going to ask me about that in my new position.)
Thank God I was quite well organized with my Christmas presents this year. The rig rag scarf for my father is finished and a crochet scarf for my mom will shortly be. May take some pics and show you.
Greetings!
12/19/11
Christmas Markets No 6
Berlin, Gendarmenmarkt: I just loved this city of tents with stars all over the place. Sorry for the low quality. I normally don't take pictures at night just because my little Lumix camera just can't cope with it. But my time in Berlin was so limited and I wanted to give you an impression.
The atmosphere there was the best! Even though one had to pay 1 Euro to get in. Not really a big problem, as I know some middle age themed Christmas Markets in my home area that cost easily up to 10 Euro entrance fee, but some people in my queue were actually complaining.
Well, the prices inside aren't funny either - so I didn't even buy a hot waffle as I had planned to (3 Euro with plain sugar as opposed to 2 Euro for the same in Heidelberg).
12/18/11
And so the year comes to a close...
...with many new things to begin next year.
If you asked yourself where I was last week:
- from Sunday till Tuesday I was in Berlin enjoying the Christmas Markets there and also attending a second round job interview.
- they wanted me
- but I said NO.
- I'm not greedy or anything but I'd like to actually be able to life comfortably from now on.
- also there were no possibilities of ever going anywhere else.
- Yes, I was sad about saying NO.
- Actually it's hard to always get rejected when searching for a job but being the one to reject a job is even harder.
- I went to Munich on Thursday for another job interview.
- I got this job! (What's wrong with december?? ;) )
- I said YES.
- I will live and work near Munich starting from January 2nd.
- I'm super nervous if I'll be able to do everything the way they want it.
- Also about finding new friends.
But I'm happy that the Time of Waiting is over now. My life starts afresh.
At this point I'd like to thank YOU, my readers (especially the BIG FIVE up in the corner) for finding me here and following the hardest year of my life.
I like writing here and will go on. Please feel free to come back here often!
Greetings!
12/10/11
Christmas Markets No 5
Christmas Market in Frankfurt/ Main at the Römer, where you can see the last buildings from the late middle ages in Frankfurt. From what I gather most old buildings were destroyed during the bomb raids in World War II, even those you can see here. These buildings were rebuilt in the 1950s. The Christmas Market in Frankfurt - as in most big German cities - covers several areas trough out the city.
12/7/11
Christmas Markets No 4
Well, not exactly a Christmas Market, but very close to the Middle Age Christmas market in Erfurt (last year with snow). Sadly, I never took pictures of said Middle Age market - sorry folks. The picture above shows the Krämerbrücke - as I told you in an earlier post - the last bridge with houses built on it in the north of the alps. (There are a lot of those in Italy, obviously.) It was very romantic there last year with all the snow and the lights.
In other news: I'll have a second job interview next week on monday in Berlin, and then another job interview an thursday near Munich. Thus - next week will be a job interview marathon, both jobs for beginning in january, which would also mean I might need to move between Christmas and New year. Oh my - sounds like stress is ahead!
But if I ever learnt anything this year it's this: Waiting, waiting, waiting without anything ever actually happening is the worst thing ever! So welcome the change!
Greetings! :)
12/5/11
Christmas Markets No 3
German Christmas Markets normally start after the "Sunday of the Dead" has passed or shortly before the 1st of advent. The biggest ones will go on all through december 24th. On the 24th - called Heiligabend - most will close around noon as many people need to prepare for Christmas Eve. As it is not custom to prepare a tree in early december as maybe in the US, most Germans will put up a tree on the 24th. Up till now my family always had real trees (this year it will be one from our own garden - which means spider invasion shortly after bringing the tree inside-----yeah! I'm so not looking forward to that...), so this has practical reasons as well.
Obviously going to a Christmas market in broad daylight isn't as much fun as going at night.
Christmas Markets No 2
Even if it's late at night: As promised I present to you another picture from a German Christmas market. This is the Erfurt Christmas market and it has become so popular that it is packed with people at all times (even if this picture doesn't show it). The huge cathedral in the background just adds to the atmosphere. if you have the chance - go there! And eat a Bratwurst and drink Glühwein.
12/4/11
DIY: Origami Star: Part 2 - Assembling your star
So, wenn ihr alle Teile habt (oder aber mindesten 3) kann es losgehen! 3 Teile bilden immer eine Zacke vom Stern. Zum Zusammenbauen wird kein Kleber benötigt! (Immer dann, wenn Kleber oder Schere zum Einsatz kommen, handelt es sich nicht um Origami!) Keine Angst, der Stern hält trotzdem bombenfest.
Schritt 1: Nehmt zwei Module und klappt an einem Ende die Flügelchen aus. Steckt den einen Flügel...
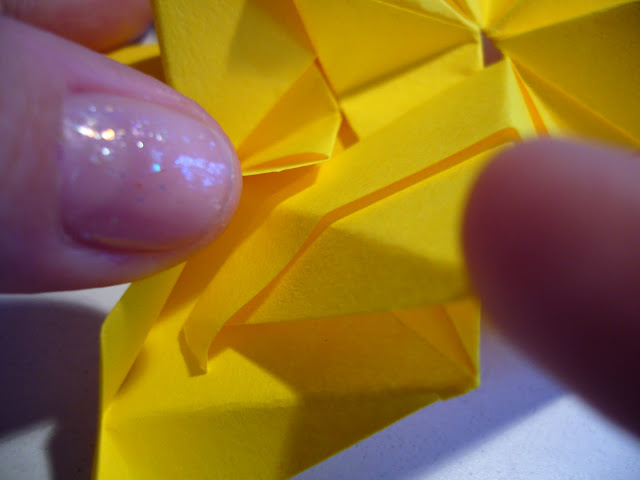
When you've finished 30 parts (or at least 3) you can start assembling. 3 parts always form one pointy end of your star. You don't need any glue! (Any paperwork including scissors or glue shouldn't be called origami.) And don't worry - the star is not going to come apart once assembled.
Step 1: Take two parts and unfold the flaps on one side. Tuck one flap ...
(Schritt 1)...so in den aufgeklappten Flügel des anderen Moduls.
(Step 1)... in the backside of the other flap.
(Schritt 1): Der eine Flügel wird dabei "um die Ecke" gelegt. Ja, das ist ein bisschen Friemelarbeit und am Anfang gar nicht so leicht, aber versucht es mit Geduld und wenig Gewalt und es wird schon werden.
(Step 1): One flap is folded around the corner. I hope you can see it in the picture above. Yes, it's kind of hard at the beginning, but you can do it - I'm sure!
Schritt 2: Das dritte Modul wird ins Spiel gebracht und macht die ganze Sache noch ein bisschen komplizierter. Aber auch hier gilt: Nicht aufgeben! Und die eine Lasche in die andere schieben.
Step 2: The third part enters the game and makes it even more complicated! But don't hesitate: Just put one flap into the other.
(Schritt 2)...Ja, es geht manchmal chaotisch zu...
(Step 2)... Yes, it gets messy sometimes...
(Schritt 2) Letztendlich sollte es so aussehen.
(Step 2) It should look like this somehow.
(Schritt 2): Das Ergebnis lässt sich noch verbessern, indem man die Kanten etwas nachzieht.
(Step 2): The result gets even better, when you go over the corners and push them together a little bit.
Weitere Schritte (Ich zähle nicht mehr mit...): An die drei übrigen Flügel durch das Anbringen zwei weiterer Module weitere Spitzen zusammensetzen. Theoretisch könnte das ewig so weitergehen, aber für den Stern brauchen wir immer 5 Spitzen in einer Runde (wenn man drauf schaut). Das heißt, wenn man vier Spitzen hat, werden die obigen zwei Flügel mit einem weiteren Modul verbunden und formen so eine fünfte Spitze. (Die nächsten drei Bilder zeigen den Prozess etwas deutlicher.)
Next steps ( Just don't bother with counting anymore...): Just go on to put jags together, but be aware that we only want to have five jags in one round (when looking on the star later). So if you have four jags - join the two flaps and one third module together to form the fifth jag and end the round. (The next three pictures show the process in more detail.)
Die Fünferrunde sollte so aussehen:
The five jags should look like this:
Und dann geht es weiter... und weiter...immer mehr Module an die Flügel anbringen. Immer drei bilden eine Spitze und 5 Spitzen bilden eine Runde. Irgendwann merkt ihr, dass sich der Stern der Vollendung nähert und dann freut ihr euch kurz - friemelt eventuell eine kleine LED-Lichterkette rein - schließt die letzten zwei Spitzen mit einem Modul und voila - der Stern ist fertig!
Wirklich eine super Beschäftigungstherapie und viel Puzzle-Spaß. Und am Ende ein schöner Deko-Artikel.
And then you go on ... and on... and on... just adding more modules to the flaps available. Remember: three modules build one jag, five jags should be joined to build a round. After a while you should get aware of your star building itself up. Now you can add a small LED fairy light and close the last two jags with one module.
Well, yes, it is very much like a 3D jigsaw puzzle. And after you've finished you've got a nice decoration not just for Christmas.
Fertig!
Finished!
*Wenn ihr Fragen habt oder Verbesserungsvorschläge - nur her damit.
*If you've got questions or need more information - just leave a comment.
DIY: Origami Star - Part 1: the modules.
Ich habe vor drei Jahren gelernt diese Sterne zu falten und bin seitdem süchtig! Ihr könnt sie auch unter dem Namen Bascetta-Sterne im Internet finden. In Deutschland gibt es auch extra Bascetta-Sterne-Papier, aber ich finde es sehr steif zum Falten und außerdem scheint das Licht von Lichterketten da nicht so schön durch. Stattdessen empfehle ich schnöde Notizzettel - sind preiswert und in verschiedenen Farben zu haben. Man braucht 30 Blatt für einen Stern!
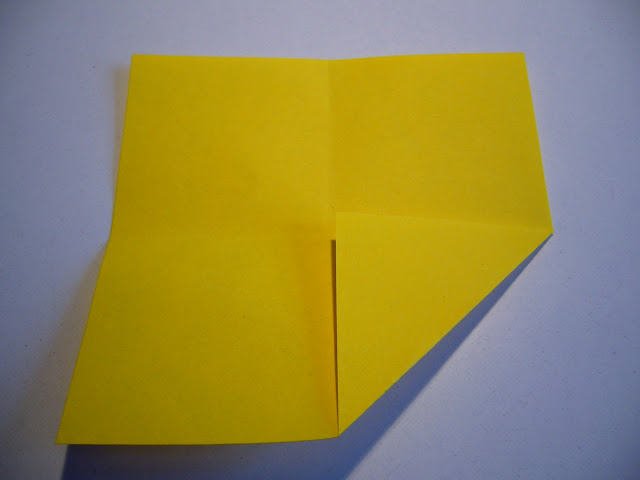
Schritt 1: Papier zweimal zur Mitte falten, so dass ein Kreuz entsteht. Untere rechte Ecke zur Mitte falten.
I've learnt this star three years ago and have been folding it ever since! It's just the perfect piece for decoration all year round - but especially for Xmas. It's called Bascetta star and you can find other DIY sites for that star all over the web. Even though there is special paper for these stars sold (at least in Germany), I tend to use normal notice paper blocs as it is way cheaper and still looks very nice when using the star with fairy lights. You need 30 pieces of paper for one star!
Step 1: Fold the paper to the middle twice to form a cross across the paper. Fold the right corner below to the middle.
Schritt 2: Zettel drehen und den Schritt wiederholen.
Step 2: Rotate the note and repeat Step 1.
* Sorry for the childish and not so stylish nail polish...
Schritt 3: Blatt umdrehen und die untere schräge Kante an die Mittellinie falten.
Step 3: Turn the note and fold the sloping corner to the middle line.
Schritt 4: Drehen und wiederholen.
Step 4: Rotate and repeat.
Schritt 5: Papier umdrehen.
Step 5: Turn the paper.
Schritt 6: Unter linke Kante wie oben gezeigt falten. (Dies ist die vielleicht kniffligste Stelle beim Falten. Aber keine Angst! Am Besten stellt ihr euch vor, dass da am Ende eine dreieckige Form bei rauskommen muss...Und achtet darauf, dass eine schöne Spitze entsteht.)
Step 6: Fold the left corner below like shown in the picture above. (That's the most tricky part of the folding procedure. At the end it is supposed to be in a triangular shape and take care to get a nice pointy end.)
Schritt 7: Einmal drehen und wiederholen.
Step 7: Rotate and repeat.
Nun sollte es so aussehen!
It should look like this!
Schritt 8: Schon wieder umdrehen...
Step 8: Turn it once again...
(Schritt 8)...und die kleinen Flügelchen zur Mitte falten.
(Step 8) ... and fold the little flaps to the middle.
Fast fertig!
Almost finished!
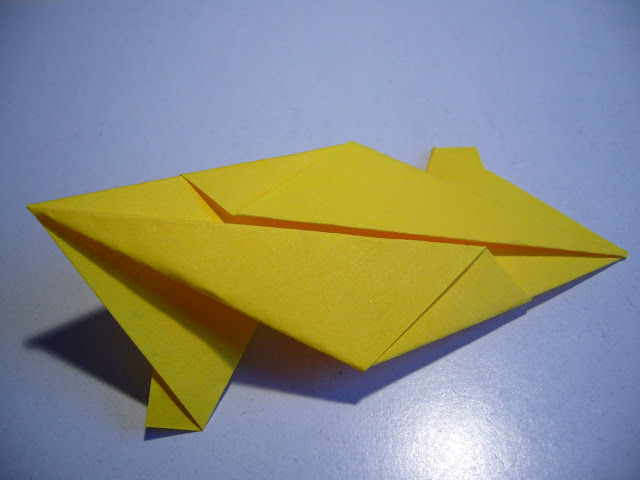
Schritt 9: Das Modul in der Mitte falten.
Step 9: Fold the part in the middle.
So wie hier!
Like this!
Ein Teil ist fertig - jetzt müssen noch 29 weitere her. Macht sich ganz gut abends beim Fernsehen, wenn man ein Buch oder etwas anderes als feste Unterlage hat. Irgendwann klappt das Falten schon fast automatisch. Allerdings sollte man immer mal wieder ein bisschen auf sauberes Falten achten, dann wird das Endprodukt - der Stern - richtig schön!
In Part 2 geht es weiter mit der Anleitung zum Zusammenstecken.
One part finished - only 29 more to go! One can do that while watching TV, but you need a book or something to fold on. Once you are used to the folding process you get quite fast doing this, but take care to fold precisely as the star will look its best with nice pointy ends.
In part 2 I'll show you how to assemble your star.
Subscribe to:
Posts (Atom)


